Nginx (LNMP) Installation on Ubuntu

In 2002, the Russian programmer Igor Sysoev began the development of HTTP-server Nginx because of a need in a new software for high-loaded web-sites. At present, besides a usual web-server, Nginx is used as a reverse or mail proxy server as well as TCP/UDP proxy server for solving common tasks. Nginx is set up and works effectively on all the basic Unix-like OS including Linux.
In June 2016, the Netcraft company analysed the responses from more than one billion sites and reported that Nginx proxied or serviced 27,9% of them. The advantages of Nginx were justly appreciated by such big companies as Vkontakte, Rambler, Yandex and Mail.ru.
At the beginning of his career, the developer of Nginx used Apache servers for the Rambler Company’s needs. Sysoev tried to optimize Apache according to the requirements of big and fast developing sites. He, for instance, created the patch compressing (controlling) the server’s responses. In most cases, it failed to eliminate Apache’s shortcomings. Thus work on Nginx was started.
So, what was the problem with Apache? Apache creates separate threads for each event, so it is inappropriate to solve C10K problem. While processing of a great number of connections, web-server starts overloading compute capacities, which leads to disturbances. Nginx uses, in its turn, non-blocking asynchronous event processing algorithms and copes stable with processing of more than 10 000 working processes simultaneously. Thus projects based on Nginx suffer from problems caused by overload much less than similar solutions on Apache.
Apache and Nginx: Demonstrable Comparison
To consider the difference between Apache and Nginx more comprehensively we conduct a speed testing of server work while solving several common tasks.
A handy single-threaded program Apache Benchmark (AB) was written for Apache work tests. The program can be used for testing of any HTTP web-server including Nginx. Install Apache Benchmark using the command:
sudo apt-get install apache2-utilsAB utility has the following syntax:
ab [options] [http[s]://]hostname[:port]/path
Regularly used options are number of concurrent requests (threads) -c and general number of requests -n, for instance:
ab -c 10 -n 100 http://example.com/-100 requests in 10 threads.
By means of Apache Benchmark comparative tests of Apache web-server processing speed and Nginx+PHP-FPM binding were carried out for three different scripts:
1. index.html - a static webpage:
<!DOCTYPE html>
<html>
    <head>
        <meta charset="UTF-8">
        <title></title>
    </head>
    <body>
<p>Hello i am main!</p>
    </body>
</html>
2. A simple php-script phpinfo.php outputting the information about php settings on a server:
<?php phpinfo(); ?>3. A “hard” php-script speedtest.phpthat executes an algorithm of prime numbers "naive search" additionally complicated with an algorithm working through complex numbers for artificial increase in load on server compute capacities:
<?php
class Complex {
    public $real = 0;
    private $imag = 0;
    public function __construct($real, $imag = null) {
        $this->real = (float)$real;
    }
    public function __toString() {
        return sprintf("(%d+%dj)", $this->real, $this->imag);
    }
}

$start = microtime(TRUE);
$primeNumbers = array();
$output = '';

for ($i = 2; $i < 100000; $i++) {
    $divisible = false;
    $in = new Complex($i);
    foreach($primeNumbers as $number) {
        if ($in->real % $number->real == 0) {
            $divisible = true;
            break;
        }
    }
    if ($divisible == false){
        $primeNumbers[] = $in;
        $output .= $in;
    }
}
?>
Test results are produced in the table in a format number of requests per second / processing time for one request:
| File | Nginx | Apache |
|---|---|---|
| index.html | 4373.21 / 45.733 мс | 3582.10 / 55.833 мс |
| phpinfo.php | 3424.28 / 58.406 мс | 1253.39 / 79.784 мс |
| speedtest.php | 0.19 / 8925.181 мс | 0.25 / 7863.261 мс |
The difference in speed of a client’s requests processing is related to web-site architecture. Apache starts a separate thread for each new connection whereas Nginx processes a new connection as an event inside of an already started worker. Also, the difference is explained by the fact that Nginx sends php-scripts to PHP-FPM server while processing of them, which also takes certain period of time, whereas Apache processes dynamic content individually. As a result, Nginx copes much better with static content and simple scripts, while Apache processes faster resource-intensive scripts, where philosophy “one client – one process” allows securing better productivity.
Nginx and PHP-FPM Installation
First of all, install Nginx packet from the repository:
sudo apt-get install nginxTo check server working efficiency you should visit its IP-address. The Nginx welcome page should appear on a screen.

Effectiveness of Nginx work can be considerably enhanced by means of competent setting. The difference between standard and adjusted configuration is especially visible during heavy loads.
Nginx Configuration
The main Nginx configuration file is located at /etc/nginx/nginx.conf. Its full content should roughly look in the following way:
user www-data;
worker_processes 4;
pid /run/nginx.pid;

events {
         worker_connections 768;
         # multi_accept on;
}

http {

         ##
         # Basic Settings
         ##

         sendfile on;
         tcp_nopush on;
         tcp_nodelay on;
         keepalive_timeout 65;
         types_hash_max_size 2048;
         # server_tokens off;

         # server_names_hash_bucket_size 64;
         # server_name_in_redirect off;

         include /etc/nginx/mime.types;
         default_type application/octet-stream;

         ##
         # Logging Settings
         ##

         access_log /var/log/nginx/access.log;
         error_log /var/log/nginx/error.log;

         ##
         # Gzip Settings
         ##

         gzip on;
         gzip_disable "msie6";

         # gzip_vary on;
         # gzip_proxied any;
         # gzip_comp_level 6;
         # gzip_buffers 16 8k;
         # gzip_http_version 1.1;
         # gzip_types text/plain text/css application/json application/x-javascript text/xml application/xml application/xml+rss text/javascript;

         ##
         # nginx-naxsi config
         ##
         # Uncomment it if you installed nginx-naxsi
         ##

         #include /etc/nginx/naxsi_core.rules;

         ##
         # nginx-passenger config
         ##
         # Uncomment it if you installed nginx-passenger
         ##

         #passenger_root /usr;
         #passenger_ruby /usr/bin/ruby;

         ##
         # Virtual Host Configs
         ##

         include /etc/nginx/conf.d/*.conf;
         include /etc/nginx/sites-enabled/*;
}


#mail {
#       # See sample authentication script at:
#       # http://wiki.nginx.org/ImapAuthenticateWithApachePhpScript
#
#       # auth_http localhost/auth.php;
#       # pop3_capabilities "TOP" "USER";
#       # imap_capabilities "IMAP4rev1" "UIDPLUS";
#
#       server {
#                 listen     localhost:110;
#                 protocol   pop3;
#                 proxy      on;
#       }
#
#       server {
#                 listen     localhost:143;
#                 protocol   imap;
#                 proxy      on;
#       }
#}
To set up Nginx correctly, it is important to understand functions of main commands. Mostly, setting values are selected optimal or set to autoconfiguration, but manual change of some commands can lead to visible betterment of speed and quality of site work.
worker_processes is responsible for a number of working processes. It is desirable to set an auto value in new versions to determine automatically an optimal amount.
worker_connections establishes an ultimate number of simultaneously possible connections. Their number can be calculated roughly by the formula 1 / <time of task execution, sec.>. Generally, the standard value 1024 is optimal and is edited according to the results of server load analysis.
multi_accept after its activation a working process will immediately accept all new connections at a time.
sendfile activates the sending data method sendfile, which is more effective than a standard one.
Caching
These parameters can have a significant influence on work speed of web-applications. If files caching is configured properly, you can get maximum processing speed of a web-server, consuming an acceptable amount of resources.
open_file_cache is responsible for a maximal number of files that can be kept in a cache (if the cache is overfilled, the least essential elements are deleted) and presets a time interval (60 seconds by default), at the end of which a file without any accesses is deleted.
open_file_cache_valid regulates the checking period of information about a file in a cache. Optimally, you should fix a bit bigger value than in the parameter inactive of open_file_cache max directive so that after each checking all unused files will be certainly deleted.
open_file_cache_min_uses determines the number of accesses to a file required for the file to be placed in a cache or to be deleted from it.
open_file_cache_errors forbids or allows caching of file searching errors.
Compression
Another important point in setting speed of web-server work is Gzip compression. This option is useful to save traffic and speed up web-pages download for users with low-speed Internet connection. It should be mentioned, however, that compression procedure causes by itself additional load to CPU and under overloading on a server can provoke reverse effect – the number of processed request will decrease because of compute capacity lack.
To activate compression with standard parameters, the following lines are needed to be uncommented:
gzip on;
gzip_disable "msie6";
gzip_types text/plain text/css application/json application/x-javascript text/xml application/xml application/xml+rss text/javascript application/javascript;
In this configuration Nginx will regularly compress all the files, a type of which is specified in gzip_types.
Applying Modifications
After any modifications in Nginx configuration files have been done, use the command to apply new settings:
service nginx reload Virtual Hosts Configuration
Virtual hosts settings files are in the folder /etc/nginx/sites-available. Initially, there is a default file of standard settings providing the server work “out of the box”:
# You may add here your
# server {
#       ...
# }
# statements for each of your virtual hosts to this file

##
# You should look at the following URL's in order to grasp a solid understanding
# of Nginx configuration files in order to fully unleash the power of Nginx.
# http://wiki.nginx.org/Pitfalls
# http://wiki.nginx.org/QuickStart
# http://wiki.nginx.org/Configuration
#
# Generally, you will want to move this file somewhere, and start with a clean
# file but keep this around for reference. Or just disable in sites-enabled.
#
# Please see /usr/share/doc/nginx-doc/examples/ for more detailed examples.
##

server {
         listen 80 default_server;
         listen [::]:80 default_server ipv6only=on;

    root /usr/share/nginx/html;
         index index.html index.htm;

         # Make site accessible from http://localhost/
         server_name localhost;

         location / {
                   # First attempt to serve request as file, then
                   # as directory, then fall back to displaying a 404.
                   try_files $uri $uri/ =404;
                   # Uncomment to enable naxsi on this location
                   # include /etc/nginx/naxsi.rules
         }

         # Only for nginx-naxsi used with nginx-naxsi-ui : process denied requests
         #location /RequestDenied {
         #       proxy_pass http://127.0.0.1:8080;
         #}

         #error_page 404 /404.html;

         # redirect server error pages to the static page /50x.html
         #
         #error_page 500 502 503 504 /50x.html;
         #location = /50x.html {
         #       root /usr/share/nginx/html;
         #}

         # pass the PHP scripts to FastCGI server listening on 127.0.0.1:9000
         #
         #location ~ \.php$ {
         #       fastcgi_split_path_info ^(.+\.php)(/.+)$;
         #       # NOTE: You should have "cgi.fix_pathinfo = 0;" in php.ini
         #
         #       # With php5-cgi alone:
         #       fastcgi_pass 127.0.0.1:9000;
         #       # With php5-fpm:
         #       fastcgi_pass unix:/var/run/php5-fpm.sock;
         #       fastcgi_index index.php;
         #       include fastcgi_params;
         #}

         # deny access to .htaccess files, if Apache's document root
         # concurs with nginx's one
         #
         #location ~ /\.ht {
         #       deny all;
         #}
}


# another virtual host using mix of IP-, name-, and port-based configuration
#
#server {
#       listen 8000;
#       listen somename:8080;
#       server_name somename alias another.alias;
#       root html;
#       index index.html index.htm;
#
#       location / {
#                 try_files $uri $uri/ =404;
#       }
#}


# HTTPS server
#
#server {
#       listen 443;
#       server_name localhost;
#
#       root html;
#       index index.html index.htm;
#
#       ssl on;
#       ssl_certificate cert.pem;
#       ssl_certificate_key cert.key;
#
#       ssl_session_timeout 5m;
#
#       ssl_protocols SSLv3 TLSv1 TLSv1.1 TLSv1.2;
#       ssl_ciphers "HIGH:!aNULL:!MD5 or HIGH:!aNULL:!MD5:!3DES";
#       ssl_prefer_server_ciphers on;
#
#       location / {
#                 try_files $uri $uri/ =404;
#       }
#}
To create a new virtual host let's copy the default file to the same folder and rename it to example:
cp /etc/nginx/sites-available/default /etc/nginx/sites-available/exampleEnabling Virtual Hosts
A folder sites-available contains files with configurations for all the web-server virtual hosts, so after creating a new host it should be enabled. To do this you need to create a link to this file in the folder sites-enabled by the command:
sudo ln -s /etc/nginx/sites-available/example /etc/nginx/sites-enabled/Then edit the main directives’ values, defining the new host work:
nano /etc/nginx/sites-available/exampleA listen directive determines an address and a port for IP or a path for UNIX-socket, where the server will accept requests.
listen 127.0.0.1:80 [default_server];You can specify either the address and the port or only address or only port. Also, the directive has a parameter default_server (was simply called default before version 0.8.1), which allows to make a default site from a virtual host. In this case, all the requests not related to other virtual hosts or coming directly on the server IP-address will be forwarded to it. This option is included by default in a standard default host settings, so in order to avoid a mistake (the default server must be the only one) you need to remove this parameter from a default setting file or disable the standard configured server by deleting a link to it from the folder sites-enabled. All the directive’s parameters are optional.
A root directive is responsible for a root site directory. Make a separate directory for a test example host using the command:
mkdir /usr/share/nginx/exampleAnd then install it as a root one, changing a directive value in the setting file:
root /usr/share/nginx/example;An index directive defines the files which will be searched by nginx in the root site directory and used as an index. The directive should be added with an index.php value:
index index.html index.htm index.php;You should pay attention to the fact that if in the directory there are two index files at the same time, the one that goes first will be used.
A server_name directive defines a site’s domain name:
server_name example.com www.example.com *.example.com;Besides defining the main domain name it is possible also to set up the procedure of automatic creation of sub-domains depending on a site structure. To do this you should change a value of the root directive:
root /usr/share/nginx/example /$subdomain;and then add the following condition:
    set $subdomain "";
    if ($host ~* ^([a-z0-9-\.]+)\.example.com$) {
        set $subdomain $1;
    }
    if ($host ~* ^www.example.com$) {
        set $subdomain "";
    }
This condition alters a root folder for such a type of URL like subdomain.example.com to a type like /usr/share/nginx/example/subdomain. Due to it the content of the folder created in the root site directory will be available at folder_name.example.com.
At the end ask Nginx to read again the configuration file to finish setting and apply new parameters:
service nginx reloadChecking Domain and Subdomains Work
1. If you used a non-existent domain (example.com, for instance) to access the site, you will have to edit a hostsfile for all the requests coming from your local computer to example.com to be forwarded to your server instead of a really existing site example.com. This file is located at /etc/hosts for unix-systems and at %SystemRoot%\system32\drivers\etc\hosts for modern versions of Windows. To forward from the main domain add to it the line:
<server_ip_address> example.comand the lines to demonstrate an access from several subdomains:
<server_ip_address> first.example.com
<server_ip_address> second.example.com
The mechanism of hosts file work does not support masks, so all the subdomains, with which work is planned, should be listed in the file line by line.
If you used a really existing domain instead of a test one, skip this paragraph and set up DNS-records at a domain registrar.
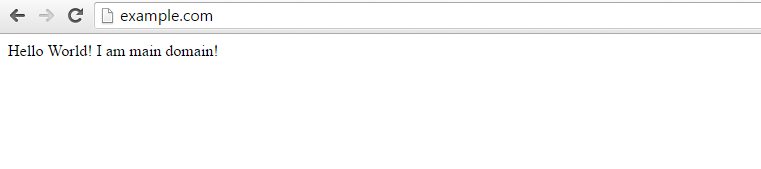
2. In the root site directory create an index file index.html for the main domain:
<!DOCTYPE html>
<html>
<head>
<meta charset="UTF-8">
<title></title>
</head>
<body>
<p>Hello, I am the main domain!</p>
</body>
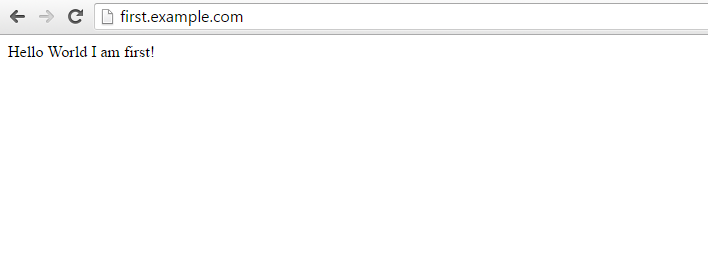
</html>and a folder first, into which we put the index file for the subdomain:
<!DOCTYPE html>
<html>
    <head>
        <meta charset="UTF-8">
        <title></title>
    </head>
    <body>
        <p>Hello, World, I am the first!<p>
    </body>
</html>
And now, when you enter example.com in a browser’s address bar, you will see contents of the root directory index-file:
The content of the folder first will be available at first.example.com:
And when you go to second.example.com, the web-server will automatically show you a standard 404-page because there is no second directory in the root site directory.
PHP-FPM Configuration
Initially, Nginx is unable to execute dynamic scripts. Thus, if we put a .php file into a folder of a standard configured virtual host and try to access it at //localhost/myfile.php, this file will be downloaded, but it will be impossible to execute it. For correct execution of files with dynamic contents you need to connect Nginx with a backend-processor php-fpm.
To install PHP-FPM use the command:
sudo apt-get install php5-fpmThe service starts automatically at the end of the installation.
To connect php processor with the virtual host set before uncomment in a settings example file the lines relating to php-fpm and delete unnecessary ones bringing location ~ \.php$ unit to the following form:
    location ~ \.php$ {
        fastcgi_split_path_info ^(.+\.php)(/.+)$;
        fastcgi_pass     127.0.0.1:9000;
        fastcgi_index index.php;
        include fastcgi_params;
    }
Restart the web-server to apply new settings:
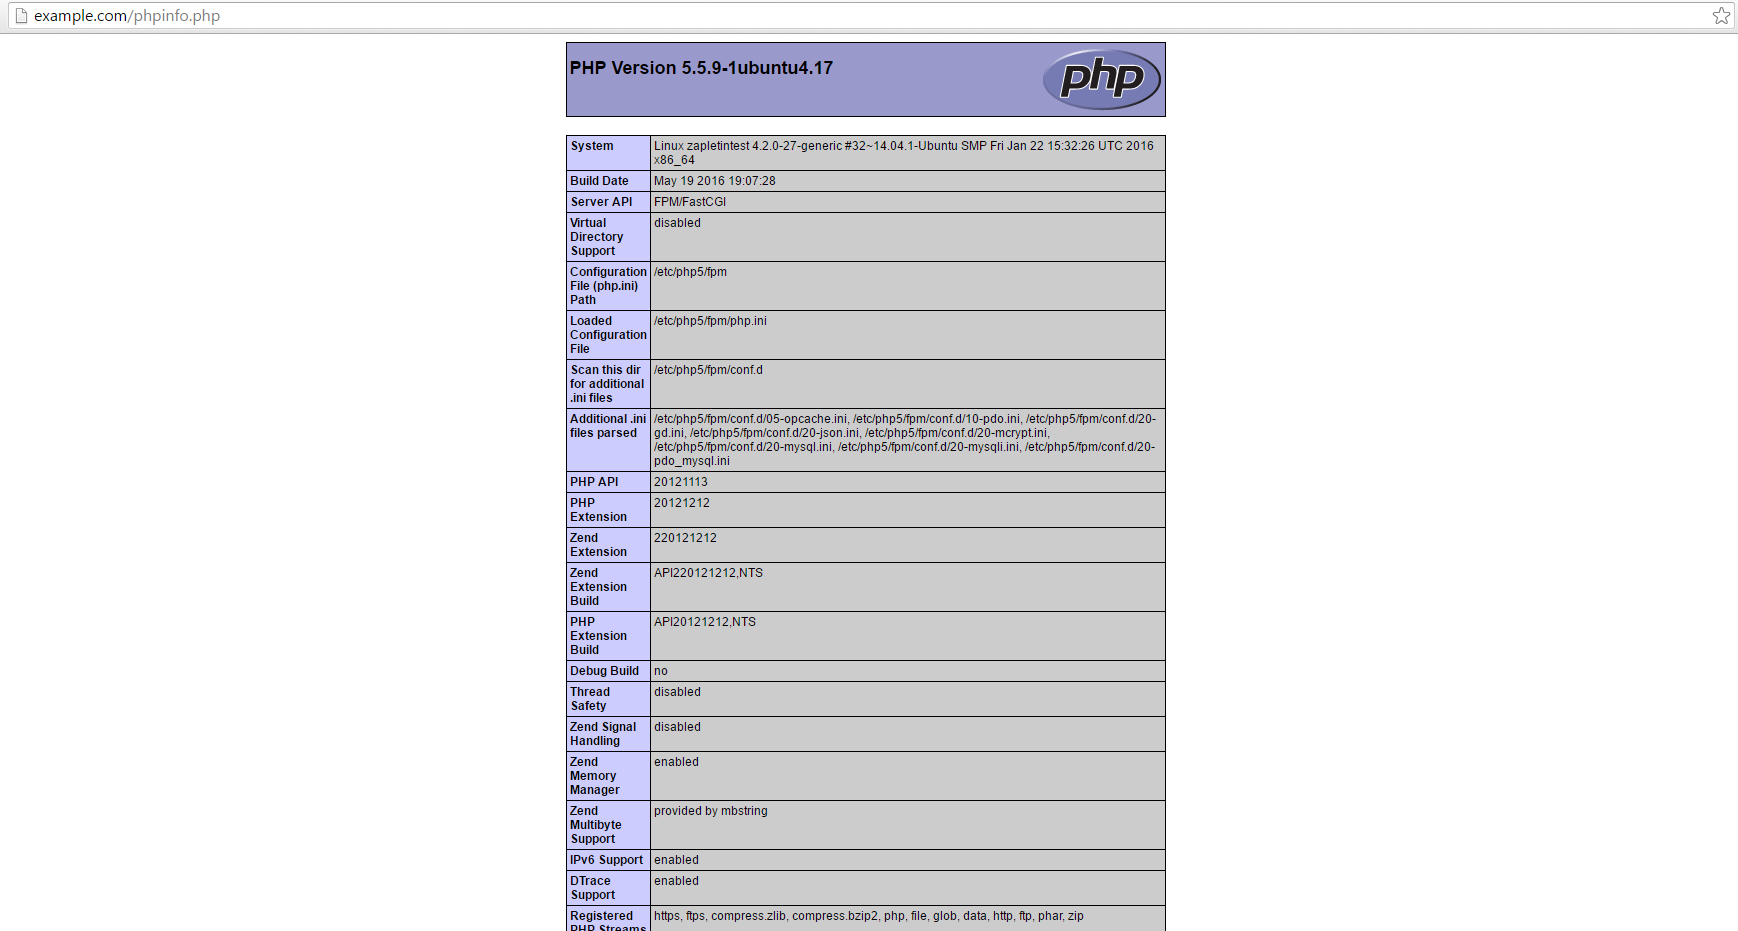
service nginx reloadThen you can create a phpinfo.php file for php work testing with the following content:
<?php phpinfo(); ?>and put it into the root directory of example host and standard default host (its default root directory is /usr/share/nginx/html) to compare results.
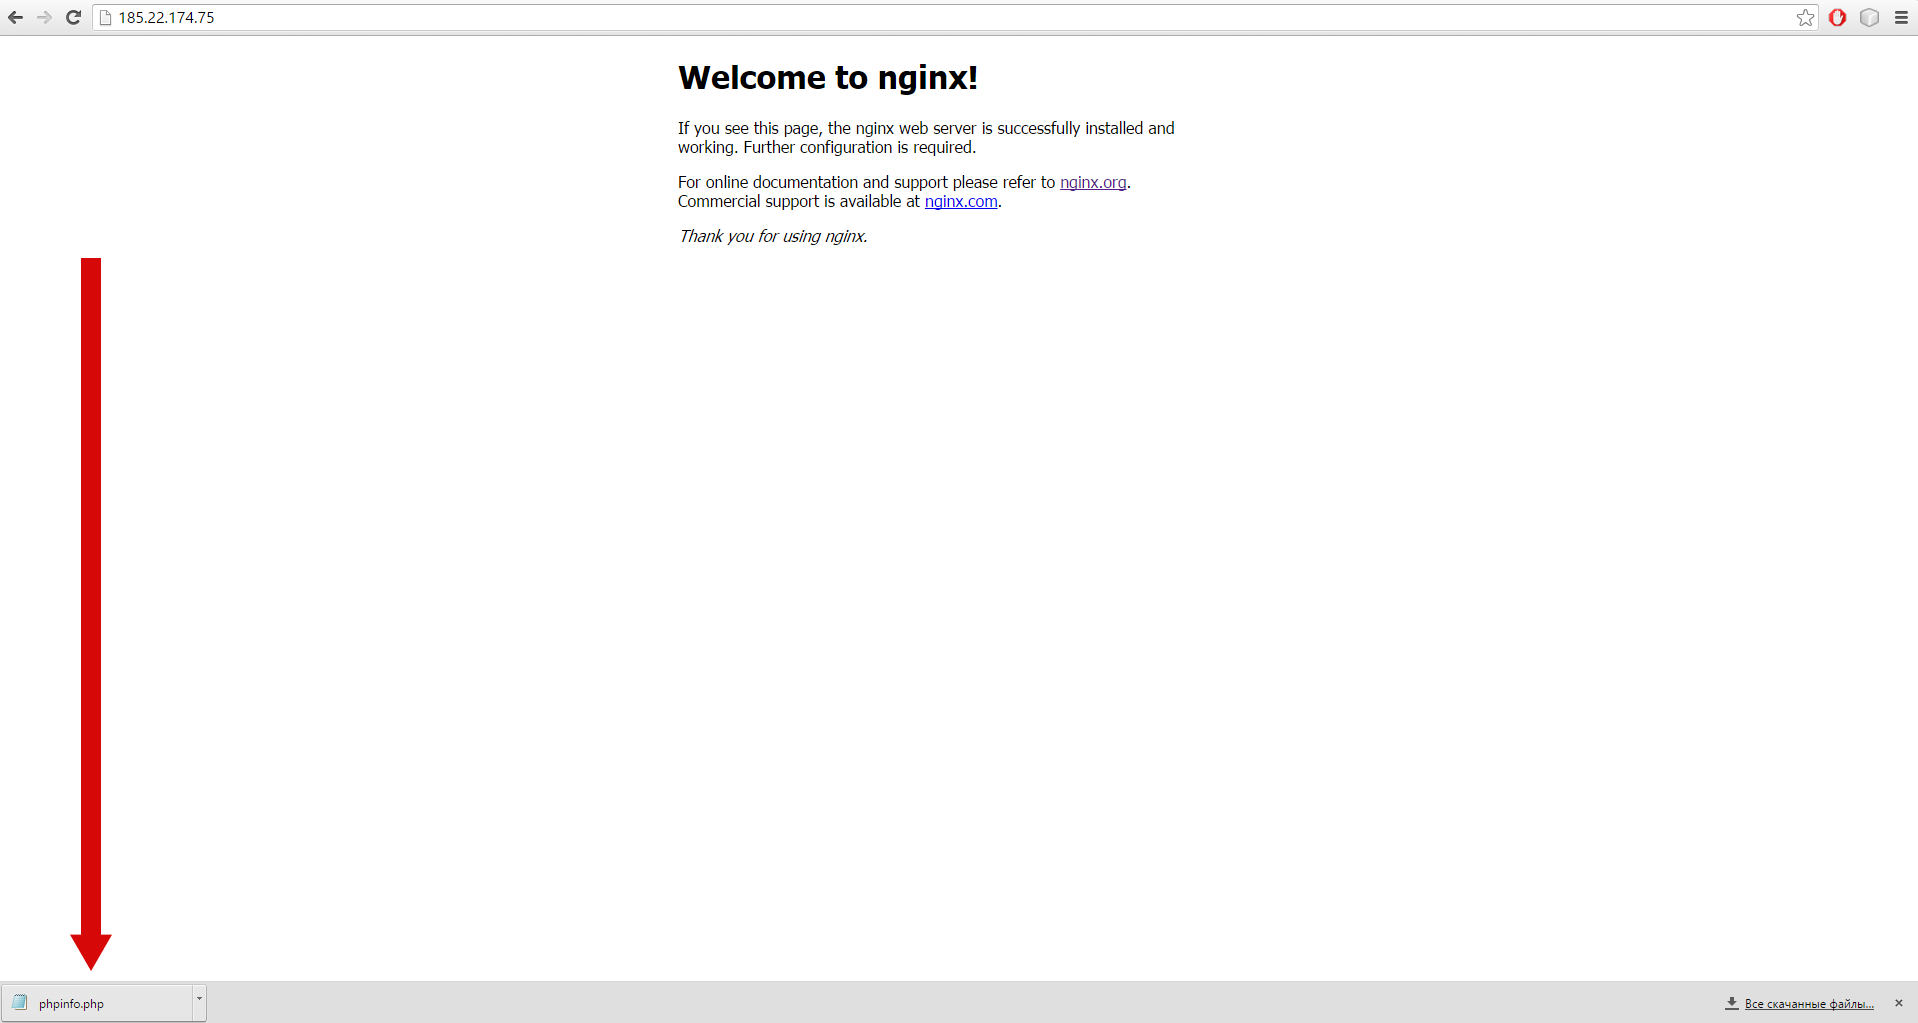
When you try to open phpinfo.php at the default host, file downloading begins:
Whereas at the example host with properly connected php-fpm the file will be correctly executed:
MySQL Installation
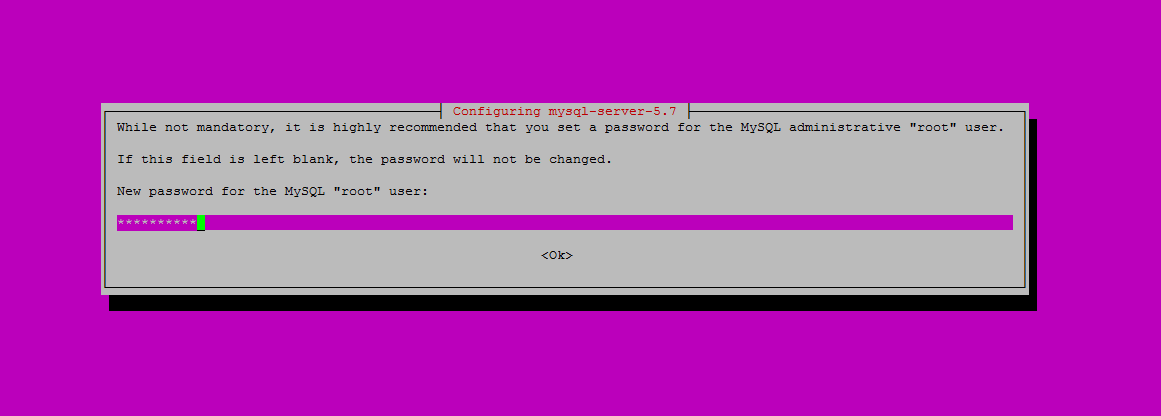
MySQL database server is installed by the command
sudo apt-get install mysql-server php5-mysqlDuring the installation it is necessary to set a password for the MySQL root user.
During the installation answer in the affirmative to all the questions.
Then phpmyadmin is installed by the command:
sudo apt-get install phpmyadminDuring the installation you will be offered to choose a web-server, with which MySQL will work; there will be no Nginx option by default, so in this menu you will need to press the TAB-key and OK button choosing none of options from the list.
To the floating question asking whether we want to use the standard config dbconfig-common answer in the affirmative and put in the password thought out earlier for the MySQL root user.
After installation, create a link in the root directory of the earlier set virtual example host in order to the web-server could find correctly phpmyadmin files and work with them:
sudo ln -s /usr/share/phpmyadmin /usr/share/nginx/exampleFurther you should activate the module mcrypt, which is needed to work with phpmyadmin, and restart PHP-FPM using the commands:
sudo php5enmod mcrypt
sudo service php5-fpm restart
MySQL server is installed successfully, phpmyadmin is available at the virtual example host’s address.
If you need phpmyadmin to be connected with any more virtual host, you should create one more link to phpmyadmin files in that directory which is written in a line of a virtual host root file – the directory, where files of this host are, for example, the /usr/share/nginx/html directory for a standard configured virtual default host. For phpmyadmin work the virtual host should be obligatory connected with PHP-FPM or any other backend-server.
After that you can go by the address of the configured virtual host and find the phpmyadmin login page at <адрес_хоста>/phpmyadmin/.

Translation of mod_rewrite Rules into Nginx Configuration
Most of mod_rewrite rules can be easily transferred into Nginx with the help of automatic converters, but they not always guarantee a correct result, and in such cases manual translation helps. A main tool for the implementation of mod_rewrite counterpart in Nginx is ngx_http_rewrite_module module directives:
rewrite regular_expression replacement [indicator]is a main module’s directive; if a request URL corresponds to a specified regular expression, is changes accordingly to a replace string. An indicator has several values (it is allowed to specify several indicators at a time), the most used of which islast– after replacement, a processing of a current URL ends completely and then a new unitlocation, is sought, which a modified URL matches;if (condition) { ... }is a usual if-operation allowing to create branching in the replacement rules;breakandreturnare used for interrupting a processing of a current request, the return directive allows a client to get back an error code or URL.
These directives can be used both in the main configuration file nginx.conf for influencing on all the requests to all the virtual hosts and in setting files of separate hosts. They can be installed in server units for specifying some general replacement rules or in location units for processing of only particular URL by a specified mask.
As a rule, most of the instructions from .htaccess are transferred into configuration files without essential structural changes. For instance, the configuration:
RewriteEngine On
RewriteRule ^([^/]*)/$ ?city=$1 [L]
RewriteRule ^([a-z\-]+)\/([a-z\-]+)?$ /index.php?city=$1&page=$2 [L]
RewriteRule ^users/profile/id(.*) /index.php?city=users&page=profile&id=$1 [NC,L]
will be transferred like this:
rewrite ^/([^/]*)/$ /?city=$1 last;
rewrite ^/([a-z\-]+)\/([a-z\-]+)?$ /index.php?city=$1&page=$2 last;
rewrite ^/users/profile/id(.*) /index.php?city=users&page=profile&id=$1 last;
Conclusion
The LNMP bundle has been installed and is ready for work. Further there can be steps of more detailed setting up an entire web-server and virtual hosts for specific tasks, CMS installation, organization of site and database protection from unauthorized access, setting file storage and e-mail server and a lot of other interesting tasks. More detailed information about setting is available in the official Nginx and MySQL documentation.


