Encryption: how to protect your data from third party access

Lately the cases of server hacking and unauthorized access by attackers to organizations’ confidential information as well as theft of users’ personal data have increased. In case of corporate data theft, we have to deal with considerable companies’ financial and reputational losses. The use of Linux OS, however, is not a panacea and it will not always protect you from theft of your information or unauthorized access to it.
It should be mentioned that just encryption is not enough for data security. It is also necessary to correctly configure server software and to comply with at least elementary requirements of security policy. All encryption methods do not allow reading data only until a user logs in to an operating system. Thus, encryption is able to effectively protect your data from physical theft of a disk, from access by a hosting provider, public authorities, or other third parties who are outside of the system. However, encryption is not able to protect your data if an attacker uses brute-force to get not strong enough password of a superuser and remotely connects to the server already run.
Encryption methods in Linux
Encryption at the file system level
This method of encryption presumes the existence of an additional software layer, which is placed over the main file system and protects user’s files without interference in lower layers. Let us consider, what utilities of this encryption type are proposed by Ubuntu OS:
- eCryptfs is a multi-layered Linux encryption system. In Ubuntu, exactly this method is used to encrypt a user’s home folder. A file encrypted by this method will be decrypted only if you have a passphrase.
- EncFS allows installing an encrypted file system. Here FUSE library and Linux kernel module are used. As in the previous method, this system is created over an existing file system and is not an encrypted block device.
Block encryption at the device level
For the device level encryption a block cipher is used, which converts the sequence of open data units into the sequence of enciphered data. In Linux, the following block encryption methods are used:
- Loop-AES is a fast and transparent file system. The Linux swap partition can also be encrypted with the help of this method. Advanced Encryption Standard (AES) is a symmetric algorithm of block encryption.
- TrueCrypt is free software with an open source code for disk encryption. The program works for both Windows and Linux OS. However, as far as we know, software developers have stopped supporting TrueCrypt, so encryption with the help of this program is rarely used now.
- dm-crypt/LUKS supports encryption of entire disks, removable media, partitions, RAID volumes, logical volumes and files. dm-crypt allows creating cryptocontainer by means of device-mapper and kernelCryptoAPI. LUKS (Linux Unified Key Setup) is a protocol of a block device encryption. By using dm-crypt tools, we can create in the folder /dev/mapper a virtual block device with a transparent encryption for both file system and a user. Moreover, all information is located in the encrypted physical partition. When data are recorded on a virtual device, they are immediately encrypted and written on a disk, and by data reading the reverse operation is performed.
We have provided you with brief information concerning the principles of encryption in operating systems of a Linux type. Now it is high time to move from theory to practice. Through the example of installation and configuration of Ubuntu server 16.04, we will show you, how the data can be encrypted in the given operating system.
Encryption of a user’s home directory during system installation
The easiest way to encrypt a user’s home folder is setting up encryption during installation of an operating system, especially if you are going to install Ubuntu server. We will show you in stages, how to make fast and correct installation and configuration. All the screenshots used in this article are the examples of our hosting panel. If you use services of other hosting companies, interface of your panel can be different, while the algorithm remains the same.
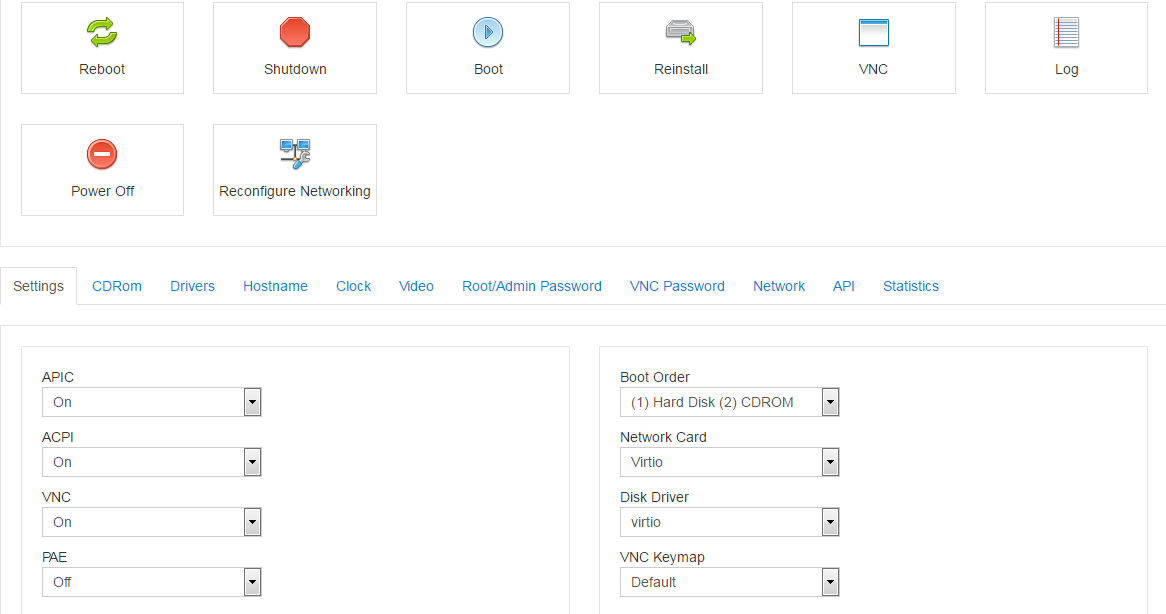
Firstly, we go to our virtual server control panel and do some preparatory work:
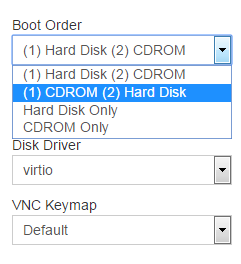
In the Settings tab we change Boot Order to "(1) CDROM (2) Hard Disk", so that the server can be primarily booted from the mounted ISO-image:
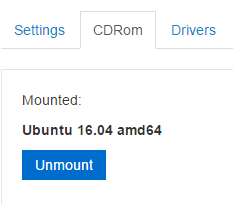
Then on the CDRom tab we choose the image we need (in our case, it is Ubuntu 16.04 amd64) and click on Mount.
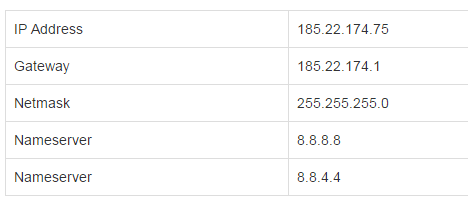
Further we go to the Network tab and click on the link with your server’s IP-address. You will see the window with our network’s parameters, which are highly important for the further configuration:
Then we press the Reboot button and wait for the virtual server rebooting.
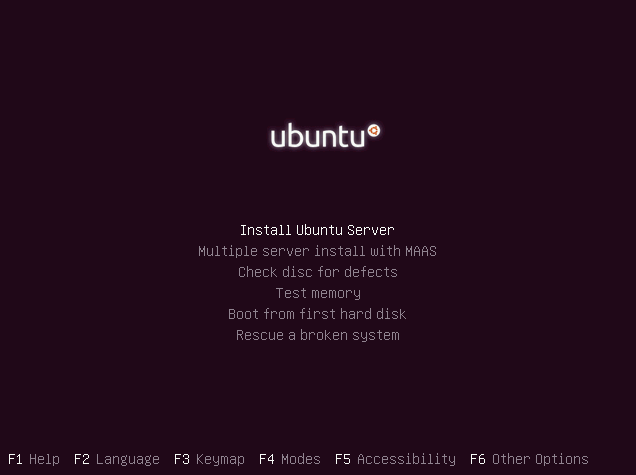
Now you need to connect to the server via VNC and start installing Ubuntu Server 16.04 distribution. Press the VNC button on the control panel, and then choose HTML5 VNC Client SSL. In a new browser window, VNC-console will be opened. There should be an initial screen of Ubuntu installation disk:
Now perform the installation process step by step – set your location, keymap etc. Here you have to specify your network’s settings that you have got from the server control panel – you need to input your IP-address, gateway, DNS-servers and so on:

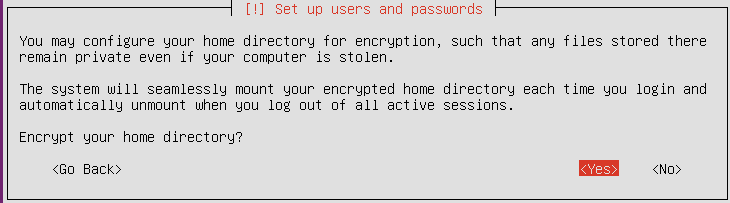
Then, after providing a username and password for a new user of the system, the installation program will offer you to encrypt your home directory. The system will mount the directory each time you log in to the system and unmount, when you log out. It will be done seamlessly for a user, and the data will be encrypted at the same time. With such type of installation, swap-partition will be also encrypted automatically. So, we definitely agree by clicking on Yes:
Further we continue installation in a regular manner, make disk partitioning and complete our task.
Important: do not forget to reset the settings on the server control panel after installation completion:
- on the Settings tab we change Boot Order back to "(1) Hard Disk (2) CDROM";
- then on the CDRom tab we press Unmount;
- and reboot the server.
For the first login to the server, the system will ask you to enter the name and the password we have created during installation.
That is basically it – your home folder is encrypted. To get the recovery data passphrase, type in terminal the following command:
$ ecryptfs-unwrap-passphraseThis passphrase should be kept in a safe place, because you might need it to restore the data manually if “something goes wrong”.
Encryption of a user’s home directory after Ubuntu installation
Let us consider the case, when you need to encrypt your home directory on an operating system already installed. Fortunately, you do not have to make reinstallation in such a case. Ubuntu provides an opportunity to encrypt a user’s home directory by eCryptfs method in a system already installed. To do this, you need to enter just a few commands in the console. First of all, let us update the index of our system’s repositories:
$ sudo apt-get updateBefore we encrypt a user’s home folder, we need to make some preparations. Firstly, we make a backup copy of your home folder and other data in case of unforeseen circumstances. Actually, the system will automatically create backup during encryption, but additional precautions are always a good idea.
Now we install the utilities for encryption:
$ sudo apt-get install ecryptfs-utils cryptsetup
Under your account you will not be able to encrypt your own home directory, so you need to create a new user with an ability to perform sudo commands. We enter the command in the consoles to create a new account for an “exampleuser”:
$ sudo adduser exampleuserThen we specify information about the new user and create a password for him. In order to let the new user use sudo, we include him into the group of the same name:
$ sudo usermod –a –G sudo exampleuserThen without rebooting the system, we log out of the current user’s account with the aim of logout command and log in to the new account of exampleuser, under which all our further actions will be performed. To encrypt the main user’s home folder, we need to use the following command:
$ sudo ecryptfs-migrate-home -u usernamewhere username is the name of the user, whose home directory you are encrypting.
So we enter the defined user’s password, and voila – the home folder is encrypted.
To encrypt swap-partition, you need to perform the following command:
$ sudo ecryptfs-setup-swapWe log out of the exampleuser’s account and log in to the main user’s one. And again we display recovery system passphrase, which should be saved:
$ ecryptfs-unwrap-passphraseThat is it, encryption of home directory is completed.
Encryption of an entire hard disk drive
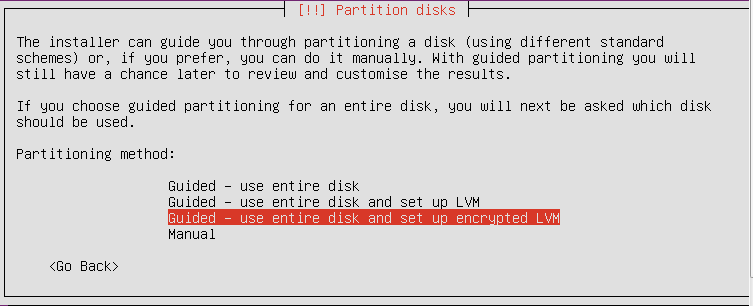
In previous paragraphs we considered methods of encryption for a user’s home folder in Ubuntu with the use of ecryptfs utility and tried encryption at the file system level. Undoubtedly, this method has its benefits, but sometimes it is not sufficient, however. The matter is that a root partition is not encrypted, and a qualified attacker can obtain the list of files from a user’s home folder despite the fact that home directory is encrypted. For more reliable protection, one can use methods of block encryption, i.e. to encrypt an entire disk at lower level. We will show further, how to create one big encrypted partition, above which we will mount usual partitions /home, /swap (they form a virtual LVM group) and leave only one small unencrypted partition /boot. A user will have to enter password each time server boots. This option is included into the standard operating system installer starting from Ubuntu 12.10 version.
So, let us come back to step-by-step installation of operating system from the installation example described in the first part. Now you do not need to encrypt home directory as you will have an entire disk encrypted. At the stage, when the installer offers to choose a disk partitioning method, click on the option “Guided – use entire disk and set up encrypted LVM”.
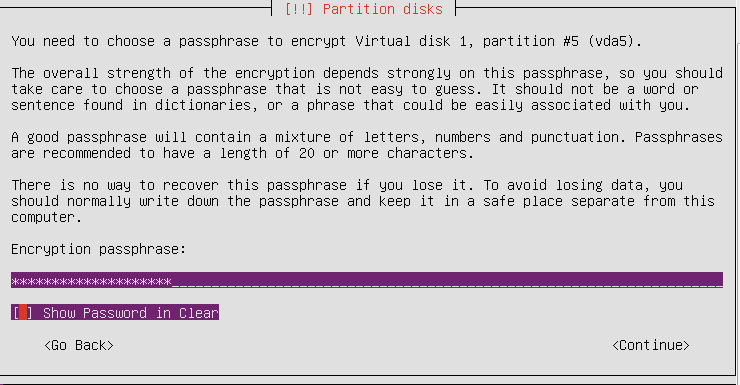
Then we make disk partitioning after choosing a needed disk. The next stage is vital, because you have to create a passphrase for encrypting. It is better to use 20 and more characters including numbers, letters and special symbols.
Further the system notifies, which partitions will be formatted. We accept all the changes and finish the installation normally. Thus, encryption of an entire disk is completed.
After installation completion, we reboot our virtual server and enter the passphrase created during installation. Then we can log in to a user’s account as usual.
So, we have shown you on the real examples, how one can encrypt user’s data in Ubuntu Server operating system by using different methods. We hope that this article will help users to protect their confidential information from unauthorized access.


